Many people spend a lot of time finding the best clearing saw for them, which is great. Unfortunately, there are then many who do not put the same energy into taking care of their machine after the purchase.
A clearing saw or a brush cutter is a fairly large investment, so I think it is important that you take care of your saw. Partly because it should last a long time, but also because it should be safe to work with.
You can usually read about grinding and maintenance in the brush cutter’s manual. Unfortunately, I find that many manuals tend to be somewhat unclear and unfortunately not explaining all the steps, which is why I have chosen to write this post. As detailed as possible I’ve written this guide that step by step talks about how to grind and maintain your clearing saw.
In some steps, I have also added tips on things I have learned over the years that I think make the work easier.
If you feel safe with how to grind and care for your brush cutter, you can jump down to the last paragraph of the text where I have summarized all the tips under one heading.
Table of Contents
How to Sharpen a Clearing Saw Blade
As the clearing saw is used, its cutting blade will wear and become blunt, so it needs to be sharpened at regular intervals. The blade may also need to be sharpened if you have bumped into the ground or a large rock during work. (In manuals and on the internet, this can sometimes be called “filing” instead of “grinding”, but these are simply two different terms for the same thing).
Discard damaged blades
A saw blade that is skewed, bent, cracked or otherwise damaged must always be discarded! Never try to straighten a skewed cutting tool or otherwise fix a damaged blade. The clearing saw can be difficult to operate if the blade is not straight, which increases the risk of injury. Another risk with working with a damaged or cracked saw is that it may break during use so that parts of the blade will fly off and can hit either you or others!.
Find cracks in the blade
It can be really difficult to detect small and thin cracks in a saw blade. My tip is that you tap lightly with the file against different parts of the blade.
If there is a rattling and muted sound, this indicates that there are cracks in the blade and it should be replaced.
The sound of a complete and functional blade should be clear and sounding.
Preparations before grinding
Before you start grinding, the clearing saw must be completely switched off. Also disconnect the cable that attaches to the spark plug so that the saw does not accidentally start while you are working.
Place the clearing saw somewhere steady and firm
In order to work safely, the saw blade needs to have a stable and good support against the surface so that it does not move while you are working on the blade.
If you are outside and doing the maintenance for instance at the sawmill, it is smart to let the saw rest against a tree trunk or stump so that you get both support and a good working height.
The best and most stable way to grind the saw tool is to attach it to a vise.
You can leave the blade on the saw even when you use a vise, so you do not need to remove it.

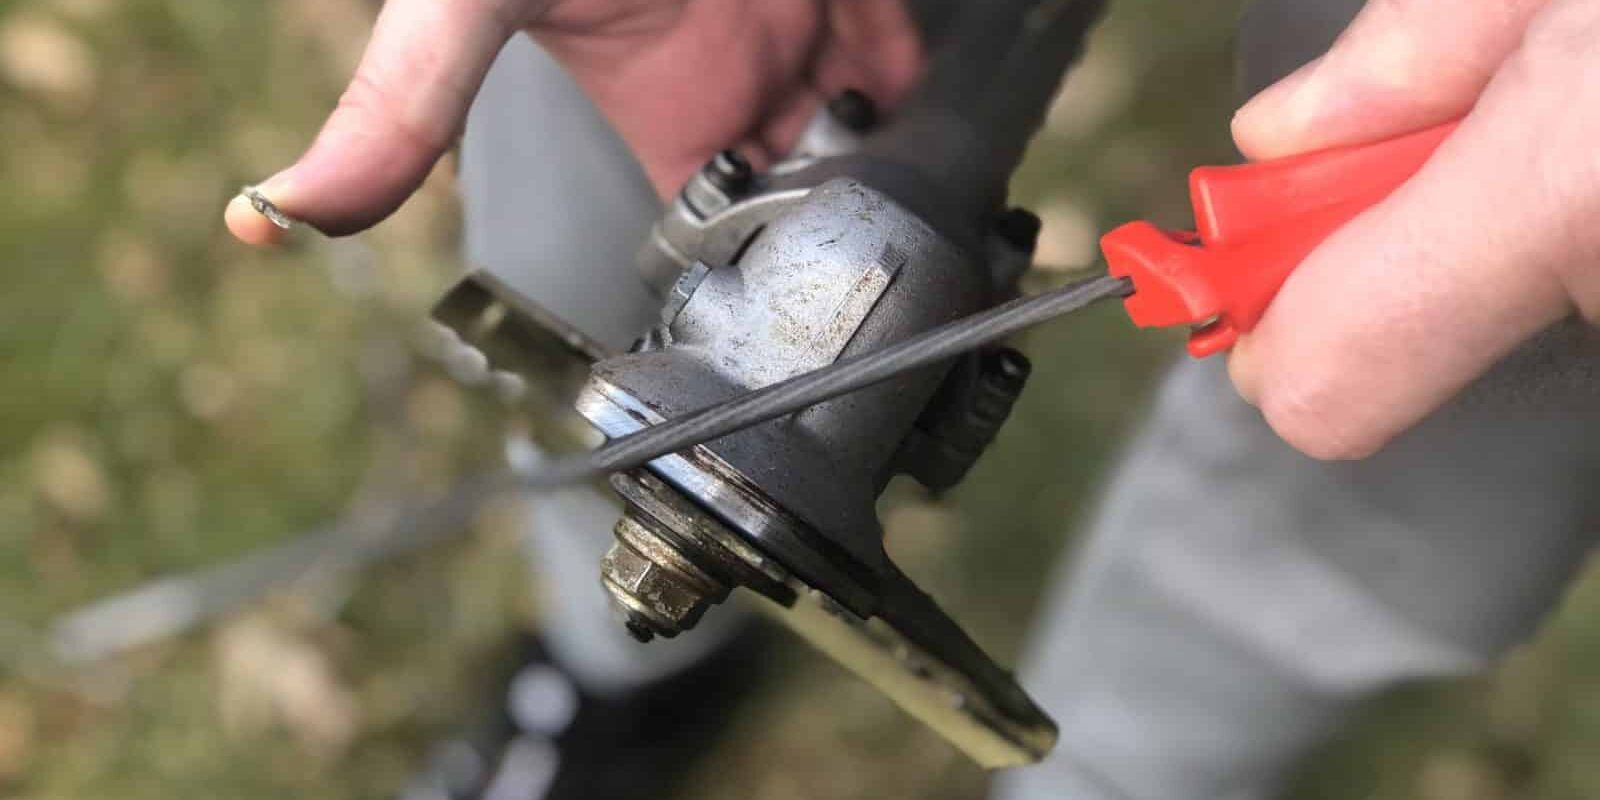
Tools for filing clearing saws
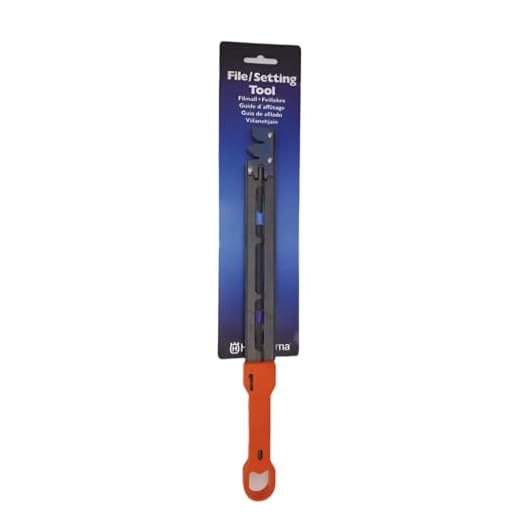
It is possible to sharpen a clearing saw with common tools you have at home in the shed, such as a round file and pliers. However, I argue that it is worth investing in a proper filing tool.
It has clear guides that mark 15 degrees, which is the angle you should grind at.
The file also has pockets that you use when you bend the teeth on the blade.
Without a proper tool, it can be more or less impossible to find the right angle on the teeth and make sure that all the teeth have the same counter angle.
This is the tool that can be seen used in the pictures:
[amazon box=B00EWFEN8Y template=list]
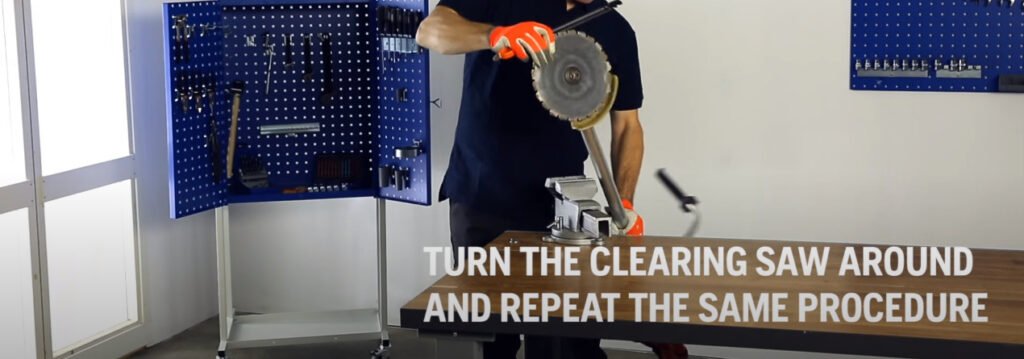
How to file the saw blade
- Start by marking one of the teeth as the starting point so that you remember which tooth you started with.

- Place the filing tool the tooth and make sure that its marking is parallel to the blade.

- Grind in long and controlled strokes in a forward motion. Then lift the file and return it to its original position before moving it forward again. In other words, you never grind back and forth, but the movement always goes from you and towards the blade. Note that every other tooth should be sharped from right and every other one from the left!
When you are satisfied with the sharpness of the tooth, move on to the next tooth. I usually start by grinding the teeth to be sharpened on the right side, before turning the saw and grinding the teeth to be sharpened on the left side.
It is also important to remember that all teeth should be filed equally so that none of them are longer or shorter than others. This is to maintain the balance of both the blade and the clearing saw.
You may also have to remove some of the metal from under the tooth, you do this by tilting the sharpening file and grinding on an angle. When this has been done you can give the tooth its final sharped edge by sitting the file flat on top of it grind a few times.
Aligning the teeth of the clearing saw
As the blade teeth wear out and grind down, they need to be cranked, bent, so that they have the right angle.
You do this by putting the tools pocket over the tooth and then slowly bend it towards you until it has the right bend.
What is the right angel is very difficult to find without a real tool because it is only about a couple of degrees you need to bend.
In my opinion the teeth should be bent before sharpening and not after.
If you choose to bend your teeth without a tool, it is very important that you try to bend all the teeth equally.
Here, too, it is important to work with every other tooth on the right and every other tooth on the left.
Information in the cutting tool packaging
Much of what I have written about can usually be read about in the cutting tool’s packaging, so make sure you save it in case you need it again in the future.
Submit for service
There are always workshops or dealers you can hand in your clearing saw to, if you feel unsure about how to grind and bend the blade.
Maintenance of Clearing Saw
Before starting any type of maintenance, repair or maintenance of your clearing saw, always turn off the saw and disconnect the spark plug cable.
You do this so that the clearing saw does not start accidentally and cause damage.
The only exception to this rule is when making idle and carburetor settings.
Maintenance should also never take place in the vicinity of an open fire as the fuel may start to burn.
When should the clearing saw be maintained?
General descriptions, both on the internet and in manuals, state that maintenance of clearing saws must take place regularly.
But what does regular really mean?
Since we all use our clearing saws differently, it is difficult to say what intervals your saw needs for maintenance. But I would still like to post some intervals you can use as general starting points for maintenance of the different parts of the saw.
Before each use
Before you start clearing, you should make a general check of the saw. See if there are any damaged parts and make sure that the cutting tool is firmly attached. Then start the clearing saw and make sure that the cutting tool does not rotate at idle and check that the vibration damper works properly.
After each use
After finishing work, do a new check to make sure that everything is still intact and that no dirt or dust has accumulated in the intake air opening for cooling air.
Before storing the clearing saw, it must be thoroughly cleaned. Simple and easy way is to use a slightly damp cloth to remove cut grass and other vegetation.
If you have access to a compressed air unit, you can use this to to blow the saw clean of sawdust and other dirt.
Every month
The things that should be checked every month are the air filter and the fuel filter.
How to do this, you will find a description further down in the text under the heading “Maintenance of air filters”.
Once a year
Once a year, you should clean the cylinder heat sinks and replace the fuel solder in the fuel tank.
Obvious maintenance measures
Obvious maintenance measures are to replace all parts that have broken, worn out or otherwise no longer work optimally.
This should be done before you start any work with your clearing saw! Otherwise there is a risk that you and / or the saw will be damaged.
Clearing Saw Air filter Maintenance
The function of the air filter is to prevent dirt and dust from being sucked in and damaging the engine. It is therefore important to regularly maintain and check the air filter. I have set once a month as a starting point, but it does not hurt to check the filter more often if you use your clearing saw a lot.
When do you need to change the air filter?
A clear sign that you have waited too long to maintain the air filter is when you notice that the engine’s efficiency decreases, that the clearing saw starts to become difficult to start or if fuel consumption increases.
How To clean the air filter:
- Start by removing the air filter cover by loosening the mounting screws.
- Clean any dirt that is on the inside of the filter cover and around the filter brackets.
- Remove the filter and check it. If it is worn, broken or cannot be cleaned, it must be discarded and replaced with a new one.
If the filter is still complete and usable, clean it with water and a soap solution. There are also those who wash their air filters in a washing machine, just remember not to use fabric softener if you do this. - Let the air filter dry thoroughly.
- Reassemble the filter and screw in the air filter cover.
Maintenance of fuel cap / fuel filter
Before you start and maintain the fuel cap, you must empty the clearing saw completely of fuel.
During the work, the fuel should be stored in an approved container.
Be careful when opening the tank cap as an overpressure builds up in the tank when the clearing saw is used. Therefore, open the lid very slowly and carefully to gradually ease the pressure.
To replace the fuel filter:
- Lift filters and drain the fuel out of the tank. If this is difficult to do with your fingers, you can use a piece of steel wire or a paper clip.
- Pull out the fuel filter with a twisting motion.
- Replace the old filter and insert a new one.
Prepare the clearing saw for use after long storage
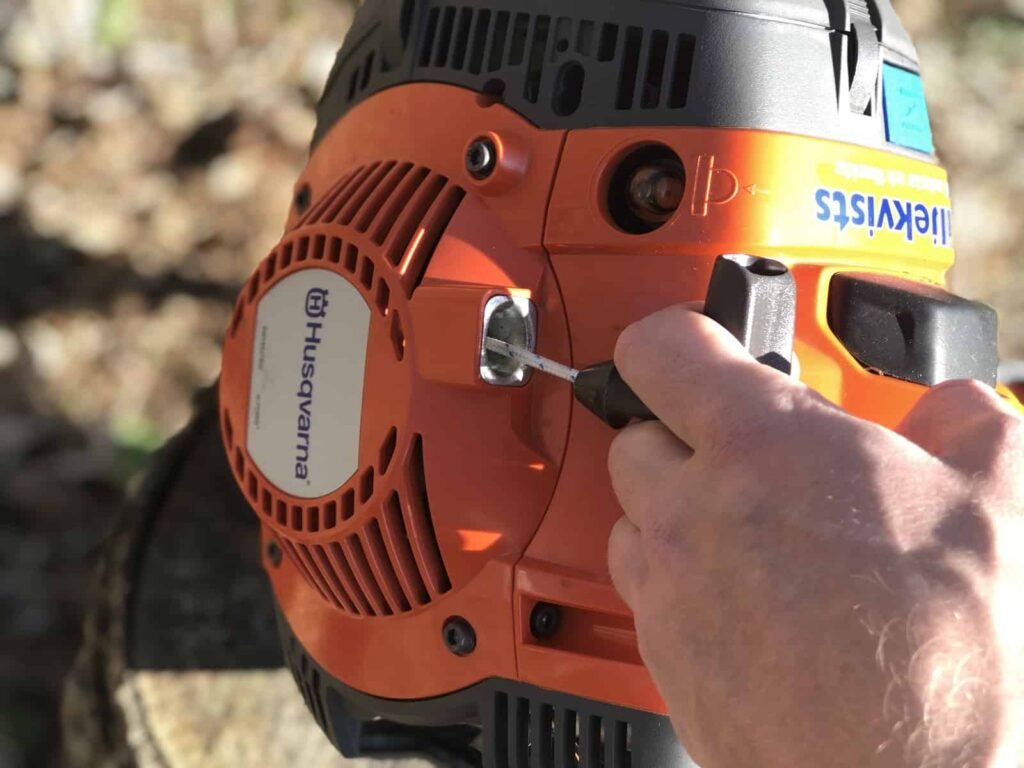
- Remove the clearing saw spark plug.
- Do a strong quick pull the saw’s starter cord to remove excess oil from the combustion chamber.
- Clean and check that the electrode distance on the spark plug is correct and that the pin does not need to be replaced with a new one.
- Replace all parts.
- Fill the fuel tank with the correct type of fuel.
Now the clearing saw is ready to be used.
New parts for clearing saw
No matter how careful and thorough you are with your clearing saw, parts will wear out and / or break. I recommend that you always choose high quality spare parts, preferably original parts if possible. Do not fall for the temptation to choose cheap alternatives as the risk is that they break quickly and cause accidents and damage to both you and the saw.
Four maintenance tips when the clearing saw is not to be used for three months or more
If you are not going to use your clearing saw for three months or more, a few more measures are required than those included in regular maintenance as above.
- Empty the fuel tank
The first thing to do before long-term storage is that the clearing saw tank must be emptied of all fuel. You should do this outdoors or in a place with good ventilation. The fuel must then be stored and handled in accordance with current environmental regulations. - Run the carburetor empty
To prevent the diaphragm from sticking to the carburetor, the clearing saw must be run empty of all fuel remaining inside the saw. - Remove the blade
The blade must also be removed, cleaned and checked. - Clean and store the clearing saw
When the clearing saw has been emptied of fuel and the cutting tool has been removed, the saw must be thoroughly cleaned. You do this best with a damp cloth and compressed air.
Then you can put the clearing saw away for storage in a dry and safe place.
Compilation of tips
- Listen for invisible cracks in the saw blade by tapping it lightly. If the blade gives off a mute and rattling sound, it indicates that the blade is damaged and that it must be discarded. The sound of an entire cutting tool is clear and resounding.
- Invest in a filing tool. A well-worth investment that makes the work of grinding and bending teeth easier and better.
- Use a vise when grinding so that the saw blade is still.
- Always buy new parts with high quality, preferably original parts if possible.
- Never underestimate the importance of maintaining your clearing saw. This is a really powerful tool that can be dangerous to use if it is poorly maintained.
Concluding remarks
In my experience, many people wait too long to grind and bend their teeth on the saw blade, plus they are not very careful about maintaining their clearing saw, which is a shame.
Not taking care of your saw makes it break down faster and will need to be costly repairs or be replaced.
A sharp and mismanaged blade also makes the clearing work unnecessarily heavy and slow.
Remember that it only takes a couple of minutes at a time to maintain, grind, bend and check a clearing saw. Minutes that are well worth investing in for your saw to last a long time and for the clearing work to be safe, easy and smooth.
If you are thinking of getting a clearing saw, below is the saw I use and then one I would recommend

Also, don’t forget to get a proper filing tool as well, to make your maintenance work fast and easy.